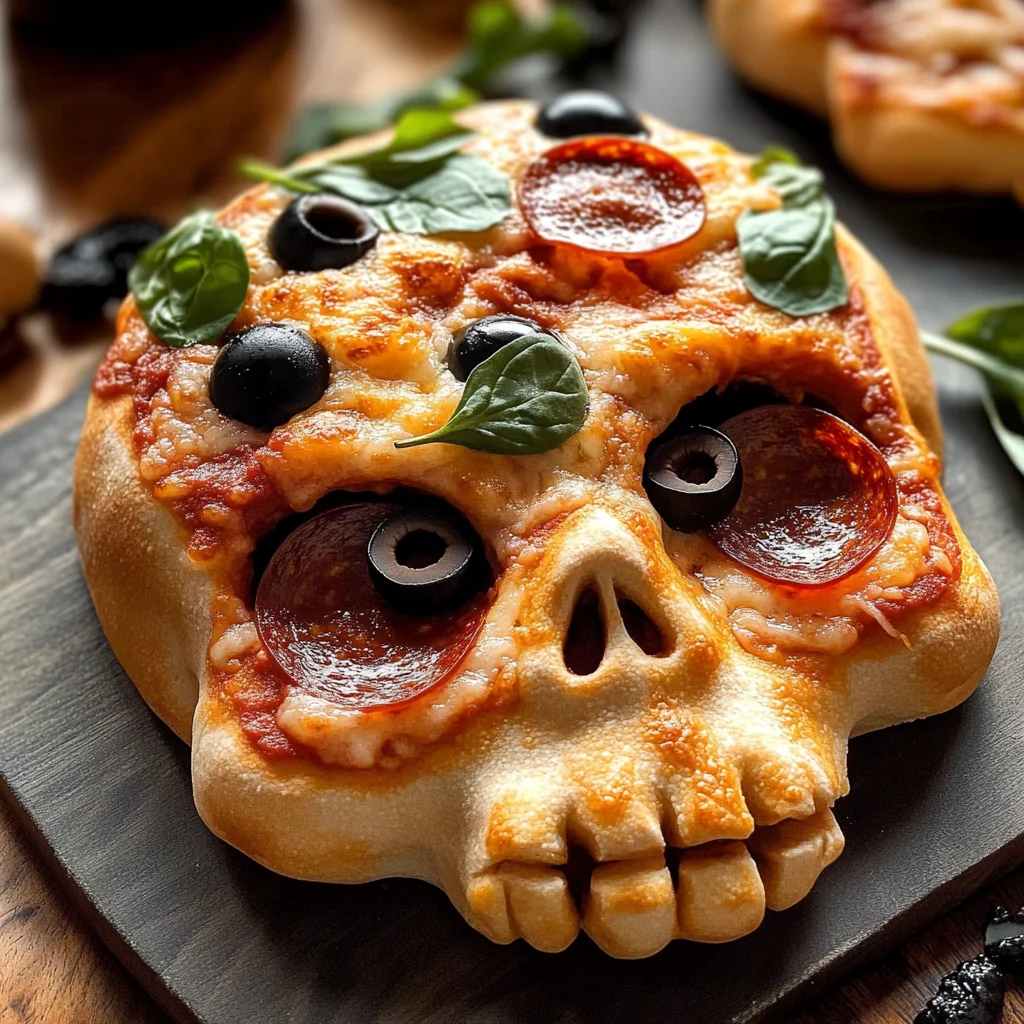
Cheesy Halloween Pizza Skulls
These Cheesy Halloween Pizza Skulls are a delightful and fun way to celebrate the spooky season. Perfect for parties, family dinners, or simply a creative meal idea for your kids, these savory treats are not only easy to make but also fully customizable. The cute skull shape adds a festive flair, making them a hit at any gathering!
Why You’ll Love This Recipe
- Fun and Festive: The unique skull shape makes dinner exciting, especially for kids and Halloween lovers.
- Fully Customizable: Use your favorite toppings to create a pizza that everyone will enjoy.
- Quick to Prepare: With pre-made dough, you can whip these up in no time, perfect for last-minute gatherings.
- Great for Sharing: These Pizza Skulls are easy to serve and share among friends and family.
- Deliciously Cheesy: Packed with gooey cheese and flavorful toppings, they satisfy any cheesy craving.
Tools and Preparation
To bring these Cheesy Halloween Pizza Skulls to life, you’ll need some essential tools. Having the right equipment ensures that your cooking process is smooth and enjoyable.
Essential Tools and Equipment
- Mini skull baking tin
- Cooking spray
- Rolling pin
- Knife or pizza cutter
- Mixing bowl
Importance of Each Tool
- Mini skull baking tin: This specific shape is key for creating the festive design of your pizza skulls.
- Rolling pin: Helps in evenly spreading the dough to the right thickness for easy filling.
- Knife or pizza cutter: Ensures clean cuts when shaping your dough, leading to better-sealed pizza pockets.
Ingredients
For the Dough
- 13 to 16 ounces of pre-made pizza dough
For the Filling
- 3/4 to 1 cup pizza sauce
- 2 cups shredded mozzarella
- Parmesan cheese (about 1/4 cup)
- Cooked sausage (about 8 ounces for 6 pizza skulls)
- Mini turkey pepperoni (about 6 ounces for 6 pizza skulls)
- Black olives (sliced)
- Sliced chicken ham (chopped)
- Crumble crispy turkey bacon
- Mini Italian meatballs
- Cooked corn kernels
- Baby spinach
- Fresh basil
For Serving
- Marinara sauce for dipping
- Chopped parsley or basil
How to Make Cheesy Halloween Pizza Skulls
Step 1: Prepare the Baking Tin
Spray the mini skull baking tin with cooking spray to prevent sticking.
Step 2: Roll Out the Dough
Dust the counter lightly with flour. Roll or stretch the dough until it is about 1/4 thick. Cut into six rectangles. Don’t worry about perfection; irregular shapes are just fine!
Step 3: Fill the Skull Cavities
Place one piece of dough into each skull cavity. Layer with sauce, mozzarella, Parmesan cheese, and your desired toppings. Add a little more sauce on top before sealing.
Step 4: Seal the Dough
Fold over the dough edges to cover the fillings. Pinch them together securely like small pockets. Repeat until all six have been filled.
Step 5: Chill Before Baking
Refrigerate the tray while you preheat your oven.
Step 6: Preheat Your Oven
Set your oven to 400 degrees Fahrenheit.
Step 7: Bake
Remove from refrigerator and bake for about 16 to 20 minutes or until golden brown. Baking times may vary based on dough type.
Step 8: Serve
Allow cooling for five minutes after baking. Unmold carefully and serve with marinara sauce and optional herbs like parsley or basil on top.
Now that you have this fun recipe ready, gather your ingredients and get started on making these delightful Cheesy Halloween Pizza Skulls!
How to Serve Cheesy Halloween Pizza Skulls
These Cheesy Halloween Pizza Skulls are a delightful treat that can be enjoyed in various ways. Whether you’re hosting a spooky gathering or simply looking for a fun meal for your family, these serving suggestions will enhance your experience.
Pair with Marinara Sauce
- A classic dipping sauce that complements the cheesy goodness of the skulls perfectly.
Add Fresh Herbs
- Sprinkle fresh parsley or basil on top for a burst of flavor and a pop of color.
Serve with Salad
- A light green salad can balance the richness of the pizza skulls, adding freshness to your meal.
Create a Halloween Platter
- Arrange the pizza skulls on a platter with other themed snacks like spider cupcakes or ghost-shaped cookies for an eye-catching display.
Offer Variety with Dips
- Provide different dips, such as garlic sauce or ranch dressing, to let guests customize their flavors.
Use Themed Plates and Utensils
- Serve these treats on spooky-themed plates to elevate your Halloween dining experience and make it more festive.
How to Perfect Cheesy Halloween Pizza Skulls
Perfecting your Cheesy Halloween Pizza Skulls can elevate them from good to great. Here are some tips to help you achieve delicious results every time.
- Use High-Quality Ingredients: Opt for fresh mozzarella and quality pizza sauce for the best flavor.
- Don’t Overfill: Make sure not to overstuff the skulls; this prevents them from sealing properly and ensures even cooking.
- Experiment with Toppings: Feel free to get creative with toppings! Try different vegetables or meats based on what you enjoy.
- Monitor Cooking Time: Keep an eye on them while baking; every oven is different, so check for doneness around 16 minutes.
- Cool Before Serving: Allow the pizza skulls to cool slightly before serving; this helps prevent burns and makes them easier to handle.
- Store Leftovers Correctly: If you have any leftovers, store them in an airtight container in the fridge for up to three days; reheat before serving.
Best Side Dishes for Cheesy Halloween Pizza Skulls
Pairing side dishes with your Cheesy Halloween Pizza Skulls can make your meal even more satisfying. Here are some excellent options that complement this savory dish.
- Garlic Bread: A crunchy side that adds flavor and is perfect for dipping into marinara sauce.
- Caprese Salad: Fresh tomatoes, mozzarella, and basil create a light dish that contrasts nicely with the rich pizza skulls.
- Vegetable Platter: Crisp veggies like carrots, cucumbers, and bell peppers provide a refreshing crunch alongside the cheesy bites.
- Sweet Potato Fries: These add a slight sweetness and crispy texture that pairs well with savory flavors.
- Stuffed Peppers: Mini peppers filled with cheese or grains offer an additional hearty option alongside the pizza skulls.
- Fruit Salad: A colorful mix of seasonal fruits can cleanse the palate between bites of savory goodness.
- Zucchini Chips: Baked zucchini chips provide a healthy crunch that complements the cheesy flavors without overpowering them.
- Corn on the Cob: Grilled corn adds a sweet element that balances out the savory pizza skulls beautifully.
Common Mistakes to Avoid
Avoiding mistakes can make your Cheesy Halloween Pizza Skulls even better. Here are some common pitfalls and how to steer clear of them.
-
Skipping the Cooking Spray – Not using cooking spray on the baking tin can lead to stuck pizzas. Always spray your baking tray to ensure easy removal after baking.
-
Overfilling the Dough – Adding too many toppings can cause the dough to burst while baking. Keep toppings balanced to avoid mess and ensure proper sealing.
-
Ignoring Dough Thickness – If the dough is too thick, it won’t cook through properly. Aim for a thickness of about 1/4 for even cooking.
-
Not Preheating the Oven – Failing to preheat your oven can result in uneven cooking. Always preheat your oven to 400 degrees Fahrenheit before baking.
-
Skipping Cooling Time – Cutting into the pizza skulls immediately after baking can lead to burns and messy presentation. Allow them to cool for at least 5 minutes before unmolding and serving.
Storage & Reheating Instructions
Refrigerator Storage
- Store leftover Cheesy Halloween Pizza Skulls in an airtight container.
- They will stay fresh for up to 3 days in the refrigerator.
Freezing Cheesy Halloween Pizza Skulls
- Wrap each pizza skull individually in plastic wrap or aluminum foil.
- Place them in a freezer-safe container or bag; they can be frozen for up to 3 months.
Reheating Cheesy Halloween Pizza Skulls
- Oven – Preheat the oven to 350°F (175°C) and heat for about 10-15 minutes until warmed through.
- Microwave – Microwave each skull on a microwave-safe plate for about 30-60 seconds, checking for warmth.
- Stovetop – Heat a skillet over low heat and warm each pizza skull for about 3-5 minutes, flipping halfway through.
Frequently Asked Questions
Here are some common questions related to Cheesy Halloween Pizza Skulls that might help you perfect this recipe.
Can I customize the fillings in my Cheesy Halloween Pizza Skulls?
Yes! Feel free to swap out the toppings with your favorites, such as different cheeses, vegetables, or meats like chicken or turkey.
How do I ensure my Cheesy Halloween Pizza Skulls hold their shape?
Make sure you seal the edges well after filling them with toppings. This prevents any leaks during baking.
Can I make Cheesy Halloween Pizza Skulls ahead of time?
Absolutely! You can prepare them in advance and store them in the refrigerator or freezer until you are ready to bake.
What type of sauce works best with Cheesy Halloween Pizza Skulls?
Pizza sauce is ideal, but marinara or any tomato-based sauce will also work well. You can even experiment with pesto for a unique flavor!
Final Thoughts
Cheesy Halloween Pizza Skulls are not only fun but also versatile! You can customize these savory treats with various fillings that suit your taste preferences. Whether it’s a spooky dinner party or a casual meal, these skulls are sure to impress everyone at your table. Try them out and enjoy a deliciously festive treat!
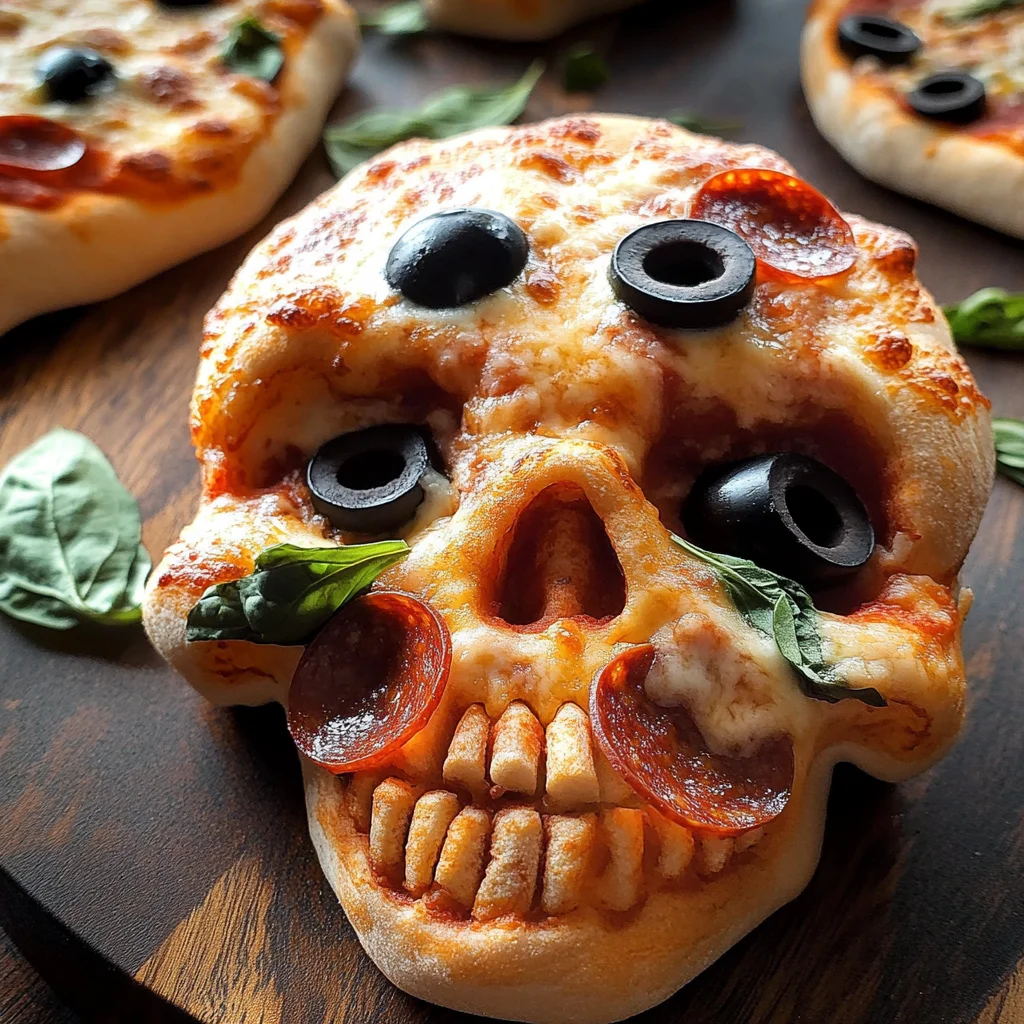
Cheesy Halloween Pizza Skulls

Celebrate Halloween with these delightful Cheesy Halloween Pizza Skulls, a fun and festive twist on traditional pizza! Perfect for parties or family dinners, these savory treats are not only easy to make but fully customizable to suit everyone’s tastes. Shaped like adorable skulls, they’re sure to be a hit with kids and adults alike. Enjoy the gooey cheese and flavorful fillings while adding a spooky flair to your meal. Gather your ingredients, roll up your sleeves, and let the creativity flow as you whip up these charming pizza bites for your next gathering.
- Prep Time: 15 minutes
- Cook Time: 20 minutes
- Total Time: 35 minutes
- Yield: Serves 6
- Category: Main
- Method: Baking
- Cuisine: American
Ingredients
- 13 to 16 ounces pre-made pizza dough
- 3/4 to 1 cup pizza sauce
- 2 cups shredded mozzarella cheese
- 1/4 cup Parmesan cheese
- Cooked turkey sausage or mini turkey pepperoni (6 ounces)
- Black olives (sliced)
- Chopped cooked chicken
- Crumble crispy turkey bacon
- Baby spinach
- Fresh basil
Instructions
- Preheat the oven to 400°F and spray a mini skull baking tin with cooking spray.
- Roll out the dough to about 1/4" thick and cut into rectangles.
- Place each piece of dough in the skull cavity, add sauce, mozzarella, Parmesan, and desired toppings.
- Fold over the edges of the dough to seal pockets securely.
- Refrigerate while the oven preheats.
- Bake for 16 to 20 minutes until golden brown. Let cool before serving.
Nutrition
- Serving Size: 1 pizza skull (approximately 130g)
- Calories: 300
- Sugar: 3g
- Sodium: 620mg
- Fat: 15g
- Saturated Fat: 7g
- Unsaturated Fat: 6g
- Trans Fat: 0g
- Carbohydrates: 32g
- Fiber: 2g
- Protein: 12g
- Cholesterol: 30mg